Recently, I've been experimenting with individually altering character stats in saved games on Dynasty Warriors 8: Empires for the Playstation 3 and have been fortunately successful doing so.
One dominant reason which resulted in me ensuing this was so I could lower my controlled character's stats and raise enemy officer stats (particularly attack, health and defense), enabling lengthier combos as officers tends to be annihilated a bit too quickly for my liking. Of course, one could easily reverse that and raise their own character stats to abnormal amounts and the enemy to nothing. Personal choice is a wonderful thing, ain't it? Anyway, that's probably not important to you—you want to just know how to change a character's stats to anything you want, correct? Well, I'll show you how!
First things first, you'll need the obligatory and rehashed on this blog Bruteforce Save Data. Be sure to download the latest version and update the database pronto (also, run the program as an administrator). I assume you already know how to use Bruteforce Save Data, but if you happen to not, read up a bit on it here and here.
Second, you'll need a save game present on Dynasty Warriors 8: Empires to modify. No, I'm not talking about system data (which cannot be decrypted at the time being), but a save game such as an Empire Mode save and quick save.
Pick the game save you want to use and open it with Bruteforce Save Data, decrypt it and open it with HxD as usual.
You first need to pick the character you want stats changed, taking note of that character's current stats.
In this tutorial, I will change my controlled character's stats (ruler). You can choose any character you wish, as long as that character is present in your current game and you can view their stats.
The first important thing is to view the character's current stats and convert them to hex.
IMPORTANT: You must remove all of your character's item equipments (if you are using any) for this to work. You can re-equip them after you are done changing the stats. Weapons and mounts can be left alone. This only applies to characters you control. Here is a screenshot of my ruler's stats:
Excuse the Japanese. English version will have no difference aside from language.
Convert the first four stat numbers to hex using this online tool. Four should be sufficient to isolate the specific character and anything less you'll run into the possibility of editing the wrong character.
In my instance, health (520) would be 208, attack (410) would be 19A, defense (550) would be 226 and leadership (510) 1FE.
Put them together IN ORDER and you will get: 208 19A 226 1FE
Now you would think that the hex above would be enough to search out in HxD and change, right? WRONG. This is because KOEI is swapping the hex in Dynasty Warriors 8: Empires. If I searched 208 19A 226 1FE I would never find anything or anything relevant to the actual stat location.
First, if any of your pair of hex are three digits, you will need to prefix a 0 to each one, such as: 0208 019A 0226 01FE
Two digits, you will need to prefix a 00. One digit prefix a 000. Four digits, do not prefix anything. The rule is to keep all pairs of hex four digits.
What you have to do now is to swap the hex. So 0208 019A 0226 01FE = 0802 9A01 2602 FE01.
Notice how the first two digits and last two digits of each pair of hex are swapped around. You must do this for all pairs of hex.
Now with that hex swapped, you can finally search it using HxD and start changing values.
This is what the search results leads to, spot on!
And here is a general idea of which pair of hex correlates to which stat:
But remember, you have to input your new desired hex swapped as well. So if I wanted 1000 for health, attack, defense and leadership, the hex will be E803 E803 E803 E803 (and not 03E8 03E8 03E8 03E8).
Results of change. Red indicates altered values.
Once you are done, encrypt the game save and presto! You've changed your character's stats! Best of all, it doesn't affect any other character other than the one you changed.
SATISFACTORY!
Tip: Once you have obtain the offsets for a certain character's stats, you can reuse those offsets again next time in any game (even a different one from the the one you modified) without redoing all the stats to hex conversion above.
You can also change your materials, money and unit likely in the same manner.
I've created a code to now remove affinity from all weapons in your collection in Dynasty Warriors 8 for Playstation 3. Just simply decrypt your game save in Bruteforce, apply the cheat code, encrypt and you're now affinity free for all weapons that you currently own! No hex searching and editing required! Of course, you have to reapply the code when you obtain new weapons.
[Remove Affinity for All Weapons in Collection] 40015D43 000000FF 47260018 00000000
You can still manually remove affinity from specific weapons only by doing it the hex method, as described in the original post. This is just an easy way to get rid of affinity entirely with little work.
Remember, put Cyclone (a low to high level) as one of your elements on each weapon you decide to use without affinity.
You can use the following code to mass change all elements on all weapons in your collection:
Xtreme Legends Testing Results: Do not attempt this on Xtreme Legends for now. Removing affinity in Xtreme Legends will cause the game to freeze. The reasoning behind it is because Xtreme Legends added gray affinity, which equates to the game's new "no affinity". Unit Commanders are the only enemies you will see with gray affinities. Attempting to use gray affinity on your own weapons will cause the game to crash, with reasons only the game developer will know.
In the original version of Dynasty Warriors 8, there is no such thing as gray affinity and removing affinity will always result in your affinity being red (during battle). Even though red, you are still technically affinity free (and also freeze free).
Do you not like the weapon affinity system present in Dynasty Warriors 8? Well, there is now an easy way to totally annihilate it using the magic value of FF (we'll get onto that in a little bit). By removing it, the combat system essentially returns back to its former Dynasty Warriors 7 days, where you wouldn't have to worry about which affinity to use. Additionally, there would be no storm rush, no variable counter and most importantly, being able to stagger/hitstun every enemy officer in the game regardless of what affinity they have.
So how do you do it exactly? Well, it's actually nothing new at all. Remember when I wrote the weapon modding guide for Dynasty Warriors 8 a long time ago? Remember the part where you could change your weapon's affinity to Heaven, Earth and Man? If so, basically all you need to do is instead of choosing Heaven (00), Earth (01) or Man (02); you replace that value with FF. This renders the weapon in particular to have no affinity whatsoever. No affinity = no inferior or superior affinity to worry about.
CHANGE AFFINITY VALUE TO FF
If you don't understand what I just said, you should definitely read up on the weapon modding guide. It's not just for the sake of removing affinity, but for also learning how to mod your weapons and have full customization over them.
Regrettably, you can only remove affinity of weapons one at a time, or together as a batch work. There is currently no code yet to automatically remove affinity for all weapons in your possession. Hence, it does take an extra bit of work, but that bit of work may pay off extremely well for those interested. 1/25/2015 UPDATE: I created a code to automatically remove affinity all weapons in your collection, so you no longer have to resort to doing any hex editing. Just apply the cheat code to your Dynasty Warriors 8 game save on Bruteforce and you're affinity free! [Remove Affinity for All Weapons in Collection] 40015D43 000000FF 47260018 00000000
On Dynasty Warriors 8 (non Xtreme Legends version), there is one side effect of removing affinity from your weapons. It will cause your weapons to do very little damage to enemy officers (on any difficulty). However, elemental and musou damage are not impacted. So if you use this, it's a MUST to put on your weapon a percentage damage element, preferably Cyclone. You can mass change all elements in your weapons by using the codes provided in this post.
I have tested this on the Playstation 3 version of Dynasty Warriors 8 for a few hours and it's fully functional. There are no game issues using it besides what is mentioned above. No crashes and no freezes.
Doing this on Xtreme Legends is not recommended due to frequent game freezes. Read this updated post for more information on why.
Below is a small demo video of removing affinity in action (notice green affinity vs red/null). I purposely added Cyclone only on the Dragon Spear to show you the damage bug. The damage bug is very apparent in the Dual Hookblades, but the Dragon Spear shows off how elemental and musou damage are not affected.
I should have posted this bit of news earlier, but thanks to chaoszage, you can successfully decrypt the second layer of Dynasty Warriors 8: Xtreme Legends with a free Windows program that requires no hardware or devices.
As you may have recalled, Dynasty Warriors 8: Xtreme Legends (along with all newly released KOEI games) has incorporated double layer encryption security for save files. Up until now, the only method of fully decrypting the game saves required usage of paid devices, such as Game Genie and PS3 Cyber Save Editor.
Why would you need to decrypt the game save? Plenty of scenarios—if you want to resign it to another user's profile/PS3, mod your save data, transfer regions, etc.
The guide for usage is included in the download. Remember that you need to pair the decrypter with Bruteforce Save Data. First layer of decryption is done via Brutefroce and the second layer is with this tool.
I know I mentioned SAVEDATA.JP earlier in November 4th's post titled "Musou Orochi 2 Japanese Platinum Game Save"; however, I felt like this awesome website deserves a more honorable and noticeable mention. I also wanted to give a little tutorial on how to navigate the website (whether you understand Japanese or not) and how to download game saves and find game save codes (for usage with Bruteforce Save Data).
So basically, if you're reading this post and are thus far interested, you should head on over to SAVEDATA.JP now. By the way, give it a bookmark as I'm sure you will refer back to it in the future.
When you first arrive at the website, you'll be greeted to a list of game consoles with links next to each:
Sounds like you know what to do right? Yep, simply click on the picture or link to the console you want to find game saves and codes for.
Afterwards, things get a little more complicated if you don't understand Japanese. Ignore all the guff on the top and scroll down the page until you start seeing a list of game names for that console (in Japanese, of course).
Game list for the PS3 page of SAVEDATA.JP
Conveniently, the website provides a link to the game's respective Amazon.jp page. Therefore, if you aren't familiar with the Japanese title, simply click on the link and you will be directed to that game's Amazon.jp page. There, you can then use the game's box photos to determine what game it is.
Okay, so you have found the game you are looking for. Now what?
There are three links next to each game, these are from left to right: Save Data, Save Edit,Questions and Other.
Save Data will direct to a message board where users on the website can upload their own game save for the game. This is what you will want to go to if you're only looking to download full game saves. Most of the time, these game saves will be 100% complete and have platinum status trophy. Each game save will be different in content and progress, so be sure to read the uploader's description (you can use Google Translate if you don't understand Japanese). Be wary of game saves that are heavily modified with codes, resulting in non-legit data and strange gameplay.
Downloading game saves will require you to resign them to your own PS3 profile before you can use them. Please see my "How to Resign PS3 Game Saves" post for more information regarding this.
Save Edit will direct to a message board where users on the website can share their codes for the game. By codes, I mean the cheats you can apply to game saves via Bruteforce Save Data. This is a more confusing area for those who won't understand Japanese. Regardless, Google Translate can also help here. If you are completely unsure of what a code does, feel free to e-mail me about it and I'll gladly translate it for you!
Questions and Other is a message board where users on the website can exchange information for one another and ask questions about the game. You don't really need to be here unless you understand Japanese.
And that's pretty much it to using SAVEDATA.JP. Simple, easy and effective, right?
Recently, I received an e-mail from someone (who I decided should remain anonymous here), asking if there was a way to resign game saves on the Xbox 360 as easy as the PS3 with no modding required.
I'm glad he/she asked, because just a few days ago I had to resign a Lost Planet 2 game save on the Xbox 360. But yes, resigning game saves on the Xbox 360 is just as easy if not easier than the PS3.
So here's how you do it:
Requirements:
Game save you wish to resign
Game save of your own from your own console and profile
USB stick/drive (configured to Xbox 360 specifications)
STEP 1: Format/Customize USB stick in Xbox 360 and copy a game save to it
The first thing you will need to accomplish is to configure your USB stick in order for the Xbox 360 to read and write files to it. This can be easily done by inserting a USB stick in your Xbox 360, going to System > Storage, select the USB stick and select "Configure Now".
When it's done configuring, copy any of your own game save to the USB stick from your profile. It doesn't have to be from same game as the one you're trying to resign.
STEP 2: Obtain game save you wish to resign
You will now need the game save you wish to resign. For this guide, I'll be using a Lost Planet 2 100% save I downloaded from a gaming forums.
The game save has to be a complete game save and not a character save. If you want to learn how to resign character saves, go down to the section labeled "How to Resign Character Saves".
Put the game save somewhere you can remember.
STEP 3: Download Horizon
Horizon is a tool set for working with Xbox 360 configured USB devices. It has a built-in save resigner tool and that's what makes it important and crucial for this guide.
Once downloaded, run the installer to install the program. Do not launch it yet.
STEP 4: Resign game save with Horizon
Plug in your USB stick to your PC and then run Horizon. Proceed to update the software if necessary.
When it opens, click on the "Tools" tab and then click "Package Manager". It should launch a new Package Manager window.
Click the blue "Open" button and select the game save file you wish to resign.
Click the "Device Explorer" tab on the right. It should spring load the explorer window with your USB stick contents.
Go to "Games" > "Your Game Name" > "Your Game Name Save", like below:
Double click the game save to open it up. It should launch another Package Manger window. Your screen should now look something like this:
Now, what you want to do is to copy the "Profile ID" of the game save from your USB stick and paste it to the "Profile ID" of the game save you want to resign.
Leave the "Console ID" and "Device ID" alone and do not copy it over.
Once that's all done, click the red button labeled "Save, Hash, and Resign".
Now, click on "Save to Device" and select your flash drive. Click "Yes" to the confirmation dialog.
All done!
STEP 4: Final moments
Remove your USB stick from your PC and plug it back into your Xbox 360.
You can either now just play your game and launch the game save directly from the USB stick or copy it back into your Memory Unit or HDD.
How to Resign Character Saves
Sometimes you may encounter or want to resign a character save rather than a complete game save. Character saves are usually labeled as SaveGame.sav while complete saves are Save0001.sav.
What you want to do here is to create and save a dummy character in your game, copy it over to your USB stick, then open the game save in Horizon.
Click the "Contents" tab. Right click the "Entry Name" and select "Replace". Select the character save you downloaded/obtain.
Don't forget to click "Save, Hash and Resign". Afterwards, you should be good to go.
NEED HELP?
Please post a comment directly in this post or send me an e-mail.
Now why would you want to do this? The following scenarios can make weapon modding a valid choice for you:
* You wish to avoid the laborious and semi-lottery style weapon tempering process in the game completely.
* You wish to not have to waste any materials such as weapons and weapon materials.
* You don't have the materials for tempering and don't want to waste time obtaining them.
* You want one or more perfectly tailored weapon(s) with the exact affinity, elements and element levels instantly.
* You want to change one or more current elements and/or affinity on a weapon.
* You want to experiment with different element builds without punishment.
* You are doing tiers/rankings.
Now this guide will be essentially the same as the Japanese version. The only difference will be in the elements list and rewording of a few things (due to official English translations).
Remember, all you need for this is an ordinary PS3 (does not have to be modded in any way), USB stick, a PC equipped with Windows and 5-10 minutes of your time.
There is NO extra experience or knowledge required, except being able to match up numbers with words!
HxD hex editor (built-in with Bruteforce Save Data)
STEP 1: Copy your game save to your PC
You will need to have your game save stored and accessible on your PC as you will be modifying its contents. The easiest way to do this is to insert a FAT32 formatted USB stick in your PS3 and copying the game save to the stick, then copy it onto your PC.
The game save should be located on your USB stick in PS3\SAVEDATA. Copy the entire NPUB31234-SAVEDATA or NPEB01364-SAVEDATA folder to your PC and leave it somewhere you can remember.
Important! Always make a backup of your game save in case anything ever goes wrong. I recommend creating a new folder called "SAVEDATA BACKUP" and putting an extra copy of your game save there. I will not be held responsible for any damages caused to your game save if you fail to make constant backups.
STEP 2: Download and configure Bruteforce Save Data
Bruteforce Save Data is a powerful game save data swiss army knife for Playstation 3. It allows one to decyrpt and encrypt game save files, add cheats, transfer region, transfer saves to another owner, and more. For this specific scenario, we will only need to use it to decrypt and encrypt files.
Once it's finished downloading, extract the RAR file and run the installer. Do not run the program yet. Create a new folder on your desktop or anywhere else you like and name it "SAVEDATA". This folder will be the folder where you store all your game saves for usage with Bruteforce Save Data. Make sure that wherever directory you store it in is NOT write protected! Drag/copy your Dynasty Warriors 8 save folder (NPUB31234-SAVEDATA/NPEB01364-SAVEDATA) to this "SAVEDATA" folder.
Download this pre-configured game.conf file and replace the existing game.conf in your Bruteforce Save Data program folder (located in C:\Program Files (x86)\Bruteforce Save Data). This will update the database with Dynasty Warriors 8 game keys so the program can decrypt and encrypt the game save.
Now it's time to run Bruteforce Save Data.
Windows Vista, 7 and 8: Run Bruteforce Save Data as an administrator by right clicking the program icon and then selecting "Run as administrator". This is very crucial! If you don't wish to do this every time you re-open the program, go to the BruteforceSaveData.exe in Windows Explorer, right click and select "Properties", then go to "Compatibility" tab and check "Run this program as administrator". Alternately, you can simply disable Windows User Account Control (UAC).
Windows XP: You can just simply double click the program icon to launch. Although, if you run into strange issues, you may want to try running as an Administrator.
If you receive an error message regarding msvbvm50.dll missing, you need to install Visual Basic Runtime 5.
You may be also requested to download Microsoft Visual Basic C++ 2010 (x86) if you don't have it installed in your system. Downloading and installing this is a must!
If all is well, you should be greeted with a nice big window.
It may ask you to download the latest cheats file, simply ignore this and close the window. Ignore any of the program's requests to input a console ID and User ID. You don't need to setup a PARAM.SFO template either. Just leave them all at default.
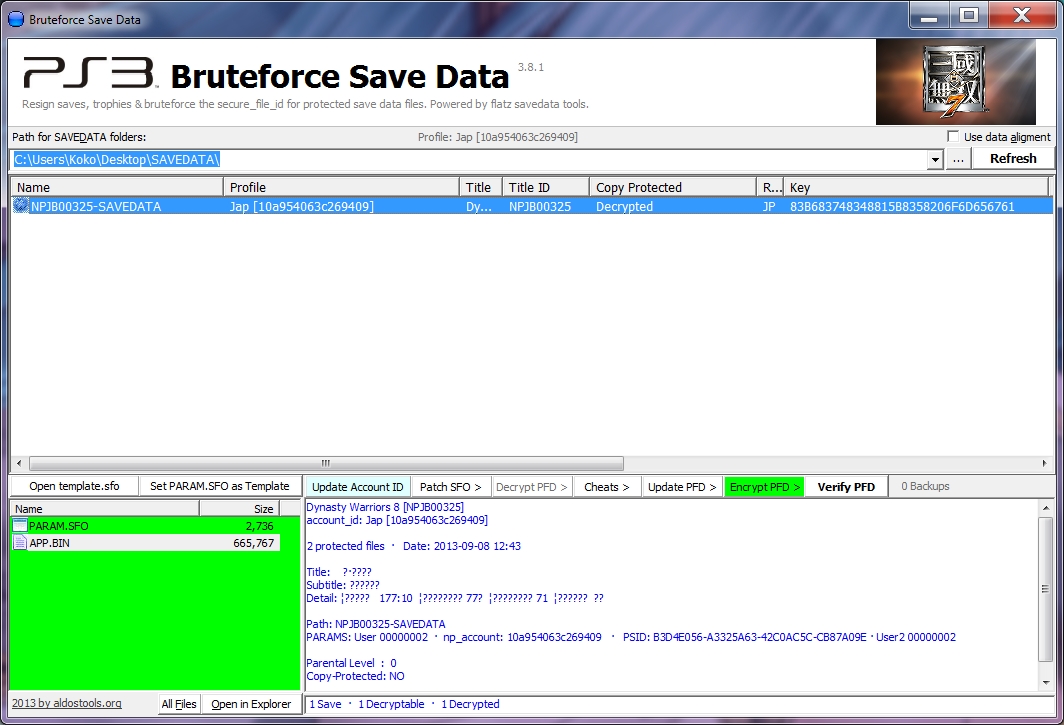
The first thing we need to do is click on the "..." button and select the "SAVEDATA" folder of where our game saves are (the one we created earlier). So go ahead and do that. Once selected, your save files should show up.
SAVEDATA folder selected as the path.
Take note of the "Key" section, there should be numbers in this field. If it's empty, you have forgotten to replace the game.conf file as directed earlier and must do so before continuing.
STEP 3: Decrypt game save files
In the Bruteforce Save Data window, make sure NPUB31234-SAVEDATA/NPEB01364-SAVEDATA is selected on the top window and click on "Decrypt PFD" button then "Decrypt All Files". You can also simply use Ctrl + D to decrypt.
How to decrypt the game save files.
After it has successfully decrypted, you should see the window turn green. This indicates the game save files are decrypted. Ignore any disc hash key errors you get.
Game save files successfully decrypted.
STEP 4: Open APP.BIN with hex editor
The APP.BIN is the file that contains all of our actual game save data. Since we decrypted it earlier, we can now open it directly with a hex editor to modify its contents. You can do this by double clicking the APP.BIN file within Bruteforce Save Data. It will open the file in HxD.
Initial opening of APP.BIN in HxD.
Once opened, you should see a bunch of scary looking hex data that no regular being can decipher. Don't worry, you will know exactly what to edit soon.
Make sure your APP.BIN file looks very close to this when you open it in HxD. It should have LOTS of 00s. If it doesn't, you didn't decrypt it or something wrong went with the decryption.
STEP 5: Obtain hex values for weapons you want to edit
Since there's no easy way to locate the exact locations of where certain weapon values are stored on the APP.BIN file, we need to refer back to the actual game to fish them out.
With that being stated, leave your PC and go to your Dynasty Warriors 8 game running on your PS3. Head into any mode where you can access full information about your weapons. Select a particular weapon you want to edit and take a note of its elements. The type of weapon you select doesn't matter. You can even edit gold and treasure weapons if you want.
Now, take a look at the list below. This list details all the weapon elements available in the game and their respective hex values.
FF = Empty/No Element
00 = Thorns
01 = Awareness
02 = Survival
03 = Frenzy
04 = Barricade
05 = Aggression (Musou)
06 = Flurry
07 = Velocity
08 = Chain
09 = Inferno
0A = Frost
0B = Thunder
0C = Cyclone
0D = Slash
0E = Venom
0F = Flash
10 = Spurt
11 = Recovery
12 = Uplift
13 = Enlightment
14 = Explosive
15 = Induction
16 = Vigor
17 = Jolt
18 = Desperation
19 = Resolve
1A = Swiftness
1B = Agility
1C = Aggression (Affinity)
1D = Protection
1E = Fear
1F = Awe
20 = Morass
21 = Jubilation
22 = Roar
23 = Triumph
24 = Greed
25 = Fury
26 = Ridigty
27 = Whirlwind
Look at the weapon you want to edit again, and match up the elements on it with their hex values. On a notepad or piece of paper, write down the element hex values in the order they appear on the weapon.
Need an example? Say my weapon elements are Flash Jubilation Triumph Thorns Flurry Swiftness. So looking at the list, I would write down 0F 21 23 00 06 1A.
The weapon I chose to edit.
A weapon will not always have six elements. So in these cases, simply write down all the element hex values it does have, then append FF to each element that it doesn’t have until it equals six total (e.g. 0C 1E 07 12 FF FF, for a weapon that only has 4 elements). To be certain you don’t edit the wrong weapon during the actual hex editing process, you’ll definitely need a weapon that has at least 4 elements attached to it.
If you plan on editing more than one weapon, take this opportunity to additionally write down the element hex values for all those weapons you're going to edit. Make sure you are using memorable labels for each, as you can get easily confused as to which hex values belong to which weapons later on.
STEP 6: Edit weapon hex values in APP.BIN
It's finally time to actually edit your weapons!
With the APP.BIN file still opened in HxD, hit Ctrl + F to open the find tool. Enter the hex values to the weapon you want to edit in the “Search for” text box. Change the datatype to “Hex-values” and check “All” under "Search direction".
The hex editor should now find your exact weapon location in the file based upon the hex values you provided it. If it fails to find anything, check back in the game and ensure that you did not write down the wrong hex values for the elements or write them in the wrong order.
You can now alter the hex values to your liking, i.e. changing the affinity, attack power, elements and element levels the weapon is currently stamped with. To change the elements, simply change the current six highlighted hex values to hex values of the new elements you want—using the list mentioned earlier as a guide.
You can use the picture below to see where each weapon data is positioned:
Changing affinity:
The hex values for each affinity are as follows -
00 = Heaven
01 = Earth
02 = Man
Changing attack power:
You can’t just simply input any number here you like and expect it to work. You will need to use a decimal to hex converter first, such as http://www.binaryhexconverter.com/decimal-to-hex-converter. The max value or attack power you can use is 255, or FF in hex.
I never change this value as doing so will break the game's rules, which I don't condone.
Changing element levels:
Element levels are from 01-10, but in hex format 10 is actually 0A. Hence, if you want to edit the level to level 10, you must use 0A as the hex value. Values for non-existent elements are marked with 00.
Here, I will change that Eagle Claw to the following: Affinity: Man Elements: Cyclone Lv.10, Velocity Lv.10, Explosive Lv.10, Induction Lv.10, Thunder Lv.10, Slash Lv.10 The end editing results looks like this:
Red indicates values that have been changed.
To edit another weapon, bring up the find tool again (Ctrl + F) and input your next weapon hex values, hit "OK" to find its location, edit it to your content, then simply repeat the process as necessary.
Caution if you have an interim save: All of your weapon data may be doubled when you have an interim save. Hence, you may need to find the weapon you want to edit twice and edit it twice. Otherwise the modified weapon may only appear on the interim save and not elsewhere or vice versa.
Once you're done editing, save the file by hitting Ctrl + S. You can then close the hex editor.
STEP 7: Encrypt the game save files
This step is simple and quick. In Bruteforce Save Data with NPUB31234-SAVEDATA/NPEB01364-SAVEDATA still selected, click the "Update PFD" button then select "Update PFD (Partial)". You can also just hit Ctrl + U. Do not use the Encrypt PFD option. The green will vanish and the window will return back to white color.
Re-encrypting the game save files.
This will now re-encrypt the file, allowing it to be then safely transferred back to your PS3 without any issues. If you forget to do this step, the game will tell you the game save is corrupted and force you to delete it and create a new one (when you transfer it back to your PS3).
Game save successfully re-encrypted.
STEP 8: Transfer game save to PS3 and test it out
You can now copy the modified save data back into your PS3. If all is well, you should have your weapon(s) modified to your desire without having to deal with any of the game's annoying in-game nuisances. Best yet, you can modify a weapon into a dream weapon in under 5 minutes compared to hours doing it in game!
Weapon change success!
Have fun, and remember—don't use this method to purposely gain an unfair advantage in the game. Meaning, create legit weapons and not illegit weapons that has impossible stats. Don't go just starting into the game and decide to mod your weapons either. You should only use this to shed time off attempting to get good weapons with the game's poor tempering system.
I NEED HELP!!!
E-mail me. It is the fastest way to get me to respond.
VIDEO GUIDE
Thanks to XthemastaX, he created a video detailing the steps and process.
Today, I'm going to show you how to easily resign any PS3 game save.
What is resigning and why is it useful? Well, if you ever downloaded or attempt to use a game save from someone else, chances are that either the game won't allow it at all or disallow you to save over it.
Resigning the game save will allow you to transform it into your own, allowing you to use it successfully and save over it as many times as you want.
In this tutorial, we're going to be resigning a Dynasty Warriors 8 game save. You can use any game save you like, of course. Also, this is specifically for non-copy protected game saves only.
This process is very easy and should take you no longer than 5 minutes.
Requirements:
Game save you wish to resign
Game save of your own from your own PS3 and user account
Playstation 3 console (can be original firmware or custom - NO modding necessary)
USB stick/drive - to transfer game saves from PS3 to PC and vice versa
The first thing we need to accomplish is to obtain a game save that is of your own (i.e. one that is currently tied to your PS3 and user account).
You can use any game save for this. In this tutorial, I will be using my own Dynasty Warriors 8 game save from my PS3 (to make things less complex).
Copy the game save of your choice from your PS3 to your USB stick. Plug the USB stick into your PC. You can simply leave the game save in the USB stick as copying it to the PC isn't necessary.
STEP 2: Download/obtain the game save you wish to resign
Now, we will need the game save you wish to resign. For this tutorial, I'm going to be using the Dynasty Warriors 8 100% game save I posted on this blog.
Place the game save folder somewhere on your PC that you can remember.
STEP 3: Download and configure Bruteforce Save Data
Bruteforce Save Data is a powerful game save data swiss army knife for PS3. It allows one to decyrpt and encrypt game save files, add cheats, transfer region, transfer saves to another owner and more.
Once it's finished downloading, extract the RAR file and run the installer. Do not run the program yet.
Create a new folder on your desktop or anywhere else you like and name it "SAVEDATA". This folder will be the folder where you store all your game saves for usage with Bruteforce Save Data. Make sure that wherever directory you store it in is NOT write protected! Drag/copy the game save folder you wish to resign (ex. NPUB31234-SAVEDATA) to this "SAVEDATA" folder.
Now it's time to run Bruteforce Save Data.
Windows Vista, 7 and 8: Run Bruteforce Save Data as an
administrator by right clicking the program icon and then selecting "Run
as administrator". This is very crucial! If you don't wish to do this
every time you re-open the program, go to the BruteforceSaveData.exe in
Windows Explorer, right click and select "Properties", then go to
"Compatibility" tab and check "Run this program as administrator".
Alternately, you can simply disable Windows User Account Control (UAC).
Windows XP: You can just simply double click the program
icon to launch. Although, if you run into strange issues, you may want
to try running as an Administrator.
If you receive an error message regarding msvbvm50.dll missing, you need to install Visual Basic Runtime 5.
You may be also requested to download Microsoft Visual Basic C++ 2010 (x86) if you don't have it installed in your system. Downloading and installing this is a must!
If all is well, you should be greeted with a nice big window.
It may ask you to update cheats repository, click the "Download" button to download the latest database. This is important because it will update your game.conf file with the latest game keys to ensure saves can be decrypted and encrypted.
Ignore any of the program's requests to input a console ID and User ID. You don't need to setup a PARAM.SFO template either for now. Just leave them all at default.
The first thing we need to do is click on the "..." button and select the "SAVEDATA" folder of where our game save is (the one we created earlier). So go ahead and do that. Once selected, your game save should show up.
SAVEDATA folder selected as the path.
Take note of the "Key" section, there should be numbers in this field.
If it's empty, you'll need to select the game save and hit F6 to
Bruteforce the key. Once it's Bruteforced, press the "Refresh" button to
refresh everything. The "Key" section should have now some numbers.
STEP 4: Setup PARAM.SFO template
We need to setup a PARAM.SFO template so that we can use it to resign the game save to our own PS3 and user account. This is where your own game save you transferred over earlier from the PS3 comes in handy.
To do this, in the Bruteforce Save Data program window, click on the button labeled "Set PARAM.SFO as Template". This should pop up a menu.
In the pop up menu, go to "Configure Profiles" and select "SET PARAM.SFO for Profile 1...".
How to setup PARAM.SFO template.
Now, it will ask you for a PARAM.SFO file. What you want to select is the PARAM.SFO file of your own game save (the one we transferred over earlier from the PS3, which should be in your USB stick if you haven't copied it over to your PC).
Here I selected the PARAM.SFO file from the Dynasty Warriors 8 game save I copied to my USB stick:
Once you click "Open", it will ask you to give it a friendly name. Simply enter your PS3 user account name you use.
After you click "OK", it will tell you that the current profile will be used for patches. Meaning, every time you resign a game save, it will be resigned to this profile (PS3 and user account).
Make sure your profile ID (the 16 digit number after your profile name) is not BLANK. If it's BLANK, you will need to use another game save PARAM.SFO file until you get a 16 digit number.
If you cannot get a 16 digit number, try tying a PSN/SEN account to your PS3 user account, log into it and then create a game save or save over a previous game save. You should get a 16 digit number for that save afterwards.
STEP 5: Rebuild game save with new profile
With the game save selected, click on the button labeled "Rebuild" and then select "Rebuild Full" in the pop up menu. It will ask you a confirmation dialog; select "Yes" to confirm.
If it is successful, the "Profile" field on the game save should be changed to your own profile name and unique ID.
Resign successful!
That's all there is to resigning a game save! No decrypting and encrypting necessary!
STEP 6: Transfer game save to PS3
You are pretty much finished at this point. All that's left to be done is to transfer the game save back to your PS3 and test it out (using your USB stick).
Please don't be an idiot and overwrite your current game save without making a backup of it first! I will not be held responsible for any loss or damages of your game saves if you fail to follow this caution!
If all is well, the game should throw you no warnings about using another person's game save and you should be able to save over it now.
Enjoy!
NEED HELP?
First, make sure you fully read the Bruteforce Save Data FAQ. Your issues may be resolved by reading it.
If not, please post a comment directly in this post or send me an e-mail.
CAN I SEND YOU MY SAVE TO RESIGN?
At current, I no longer accept requests to resign game saves for someone. Please read this post of the reason and for more information.
This week, I'm going to show you how to easily transfer your PS3 game save to another region (e.g. Japan to US, US to EU, etc.). This method is incredibly effective most of the time and everything should work 100% once transferred—all your progress, trophies, stats, etc.
In this guide, I'll be using as an example a Dynasty Warriors 8 Japanese game save which I will be transferring from Japan region to US region.
Requirements:
Save data from the game and region of your choice
Title ID of the game with region you want transferred to
Playstation 3 console (can be original firmware or custom)
USB stick/drive - to transfer game saves from PS3 to PC and vice versa
You will need to have your game save stored and accessible on your PC as you will be modifying its contents. The easiest way to do this is to insert a FAT32 formatted USB stick in your PS3 and copying the game save to the stick, then copy them onto your PC.
When copying from PS3, the game save should be located on your USB stick in PS3\SAVEDATA. Copy the entire game savefolder to your PC. Put them somewhere you can remember, such as the desktop.
Important! Always make a backup of your game save in case anything ever goes wrong. I recommend creating a new folder called "SAVEDATA BACKUP" and putting an extra copy of your game save there. I will not be held responsible for any damages caused to your game save if you fail to make constant backups.
STEP 2: Download and configure Bruteforce Save Data
Bruteforce Save Data is a powerful game save data swiss army knife for PS3. It allows one to decyrpt and encrypt game save files, add cheats, transfer region, transfer saves to another owner and more.
Once it's finished downloading, extract the RAR file and run the installer. Do not launch the program yet. Create a new folder on your desktop or anywhere else you like and name it "SAVEDATA". This folder will be the folder where you store all your game saves for usage with Bruteforce Save Data. Make sure that wherever directory you store it in is NOT write protected Drag/copy your game save folder (e.g. NPJB00325-SAVEDATA) to this "SAVEDATA" folder.
Now it's time to run Bruteforce Save Data.
If you receive an error message regarding msvbvm50.dll missing, you need to install Visual Basic Runtime 5.
You may be also requested to download Microsoft Visual Basic C++ 2010 (x86) if you don't have it installed in your system. Downloading and installing this is a must!
If all is well, you should be greeted with a nice big window.
It may ask you to update cheats repository, click the "Download" button
to download the latest database. This is important because it will
update your game.conf file with the latest game keys to ensure saves can
be decrypted and encrypted.
Ignore any of the program's requests to input a console ID and User ID. You don't need to setup a PARAM.SFO template either. Just leave them all at default. The first thing we need to do is click on the "..." button and select the "SAVEDATA" folder of where our game save is (the one we created earlier). So go ahead and do that. Once selected, your game save should show up.
SAVEDATA folder selected as the path.
Take note of the "Key" section, there should be numbers in this field. If it's empty, you'll need to select the game save and hit F6 to Bruteforce the key. Once it's Bruteforced, press the "Refresh" button to refresh everything. The "Key" section should have now some numbers.
STEP 3: Decrypt game save files
Back in the Bruteforce Save Data window, make sure the game save is selected on the top window and click on "Decrypt PFD" button then "Decrypt All Files". You can also simply use Ctrl + D to decrypt.
How to decrypt game save files
After it has successfully decrypted, you should see the window turn green. This indicates the game save files are decrypted. Ignore any disc hash key errors you get.
Game save files successfully decrypted
STEP 4: Change Title ID of game save
In order to change a game save to another region, we need to change its Title ID. To do this, right click on the game save and select "Change Title ID/Region". You can also simply hit Ctrl + I to do the same task.
How to activate Change Title ID/Region.
You should now get a pop-up window requesting you to enter the new Title ID. Replace the current ID with the Title ID of your destination region. In my case, I want to change the Title ID to NPUB31234. This is the Title ID of the US version of the game I'm using—Dynasty Warriors 8. Your Title ID will be different if you're using a different game. You can use PS3Index to find the Title ID of your game in its region.
Changing NPJB00325 to NPUB31234.
After you hit "OK" it will duplicate your existing game save and convert the new one into the new Title ID you've entered. Your window should then look something like this:
Title ID/Region successfully changed.
STEP 5: Encrypt game save files
In order to actually use the new game save on the PS3, we need to re-encrypt it. If you leave it decrypted (green), the game will tell you its corrupt and force you to delete it and create a new one.
In Bruteforce Save Data with the newly created game save selected (top), click the "Encrypt PFD" button then select "Encrypt All Decrypted Files".
How to encrypt the decrypted game save.
The green will vanish and the window will return back to white color. If you get an error dialog box indicating "Missing secure_file_id", the game save needs its key first. You can get the key easily by clicking on the game save, then hitting F6 (Bruteforce). Once Bruteforced, click the "Refresh" button. The key field for that game save should then be populated with numbers.
New US game save encrypted.
As an option, you can also re-encrypt the bottom original game save as well with the same steps.
STEP 6: Transfer game save to PS3, test it out and resave
You are pretty much done. All that's left to do is to transfer the newly created game save to your PS3 and test it out.
If you're transferring from Japan region to US/EU or vice versa, you'll probably notice that the game save still retains all its Japanese or English title, description text and icon; even though we completely changed the Title ID/Region.
Don't worry about this regardless, just copy it over and replace your current game save with it. When you save over it again in the actual game, it will then convert all the Japanese or English text and the game icon to the Japanese or English counterparts.
NEED HELP?
Please post a comment directly in this post or send me an e-mail.